こんにちは、山本です。
前回に引き続き、WordPressプラグイン 応用編の二回目となります。
今回はスマートフォン対応について絡めた、プラグイン作成について書こうと思います。
さて、サイトを構築する際にスマートフォン対応を行うことが多々あります。
実際にスマートフォン対応を行うとして、その場合のアプローチとして、大まかには以下に分けられるのではと思います。
- PCと共存
- 専用化
PCとの共存であれば、レスポンシブなど画面幅により表示の出し分けを行いますので、一つのソースで管理をすることが出来ますので、メンテナンスが楽になるそうです。
他に、URLが分かれないといった良さもあります。
SEO的にもURLが分かれない方が良いと、Google先生も仰っています。
ですが、欠点として共存させる関係で構造が複雑になります。
jsをどちらでも動くようにするのは、毎回骨が折れます。
次に専用化では、スマートフォンサイトをPCと別に構築する、またはネイティブアプリを作るといった方法が可能です。
レスポンシブと比較してもより、最適化を行いやすい反面コストが上がりやすといった問題があります。
今回は、どちらかといえば専用化なのですが、よりコストの低い、表示のテンプレートをPCとスマートフォンで分け、同じURLで出し分けを行えるように拡張します。
因みに私はガラケーを愛用しています。
仕様
- PC、スマートフォン用テンプレートを使用出来るように拡張する。
例)index.php -> index-pc.php or index-sp.php - PC専用テンプレートがあった場合、そちらを優先、なければ標準のテンプレートを読み込むように拡張する。
- スマートフォンもPCと同様とする。
確認
さて、まずはテンプレートはどのように呼び出されているかを確認してみます。
wp-includes/template-loader.php

if ( defined('WP_USE_THEMES') && WP_USE_THEMES ) :
    $template = false;
    if     ( is_404()            && $template = get_404_template()            ) :
    elseif ( is_search()         && $template = get_search_template()         ) :
    elseif ( is_front_page()     && $template = get_front_page_template()     ) :
    elseif ( is_home()           && $template = get_home_template()           ) :
    elseif ( is_post_type_archive() && $template = get_post_type_archive_template() ) :
    elseif ( is_tax()            && $template = get_taxonomy_template()       ) :
    elseif ( is_attachment()     && $template = get_attachment_template()     ) :
        remove_filter('the_content', 'prepend_attachment');
    elseif ( is_single()         && $template = get_single_template()         ) :
    elseif ( is_page()           && $template = get_page_template()           ) :
    elseif ( is_category()       && $template = get_category_template()       ) :
    elseif ( is_tag()            && $template = get_tag_template()            ) :
    elseif ( is_author()         && $template = get_author_template()         ) :
    elseif ( is_date()           && $template = get_date_template()           ) :
    elseif ( is_archive()        && $template = get_archive_template()        ) :
    elseif ( is_comments_popup() && $template = get_comments_popup_template() ) :
    elseif ( is_paged()          && $template = get_paged_template()          ) :
    else :
        $template = get_index_template();
    endif;

    if ( $template = apply_filters( 'template_include', $template ) )
        include( $template );
    return;
endif;
これが、実際にテンプレートを表示する箇所の記述です。
何のページであるかを判定し、そのページ用のテンプレートをincludeすることで表示するようになっています。
では、includeの直前にある、フィルターフックを確認してみます。
if ( $template = apply_filters( 'template_include', $template ) )
includeするテンプレートをフィルターに通しているようです。
// $template
/home/adjust/wp/wp-content/themes/twentytwelve/index.php
「$template」の中を確認すると、テンプレートがフルパスで格納されています。
格納されている「index.php」を「index-pc.php」に置き換えを行うことでも、テンプレートの振り分けを行うことが出来そうです。
ですが、流石にこれだけでは面白みがありませんので、もう少し掘り下げてみましょう。
では、今回は全ての条件に当てはまらなかった場合に使用される「get_index_template」を元に掘り下げてみます。
wp-includes/template.php
function get_index_template() {
    return get_query_template('index');
}
一目で分かるかと思いますが、「get_query_template」のWrapperになっています。
では、「get_query_template」はどのようになっているのでしょうか?
wp-includes/template.php
function get_query_template( $type, $templates = array() ) {
    $type = preg_replace( '|[^a-z0-9-]+|', '', $type );

    if ( empty( $templates ) )
        $templates = array("{$type}.php");
    $template = locate_template( $templates );

    return apply_filters( "{$type}_template", $template );
}
「locate_template」で複数のテンプレートの中から、ひとつへと絞込を行い、それをフィルターを通しつつ戻しているようです。
ここのフィルターを使うことでも、テンプレート分けを行うことが出来そうです。
次に、「locate_template」を追ってみます。
function locate_template($template_names, $load = false, $require_once = true ) {
    $located = '';
    foreach ( (array) $template_names as $template_name ) {
        if ( !$template_name )
            continue;
        if ( file_exists(STYLESHEETPATH . '/' . $template_name)) {
            $located = STYLESHEETPATH . '/' . $template_name;
            break;
        } else if ( file_exists(TEMPLATEPATH . '/' . $template_name) ) {
            $located = TEMPLATEPATH . '/' . $template_name;
            break;
        }
    }

    if ( $load && '' != $located )
        load_template( $located, $require_once );

    return $located;
}
テンプレートのリストを上から順に存在チェックを行い、一番始めに存在したテンプレートを表示する仕様のようです。
さて、一番下まで掘り下げましたので、どのように実装するかを考えます。
プラグインの作成ですので、当然のことながらコアファイルを直接編集することはなく、フィルターを使用して拡張を行います。
候補としては以下の2つのフィルターに限定されます。
- template_include
- {$type}_template
まず、template_includeですが、フィルター通過時に存在するテンプレートパスが渡ってくるので、端末のサフィックスを付けそのファイルがあればそれを使用、無ければ引き渡ってきたパスを返すことで振り分けが可能になります。
次に、{$type}_templateですが、これはtype毎にフィルターが分かれているのでtemplate_includeとは異なり、それぞれフィルターを作成する必要があります。
それぞれ作成するのは、手間なのでtemplate_includeで行おうと思います。
作成
いつものように、スケルトンを作成します。
// wp-content/plugins/templatePlugin/templatePlugin.php
/*
Plugin Name: templatePlugin
Plugin URI: http://www.adjust.ne.jp
Description: テンプレート振り分けプラグイン
Author: ADjust Co.,Ltd.
Author URI: http://www.adjust.ne.jp
Version: 1.0
*/
次に、template_includeのフィルターを作りつつ、トップページのテンプレートを分けられるように拡張します。
function getViewType()
{
  $ua = $_SERVER['HTTP_USER_AGENT'];

  return preg_match('/(iPhone|Android)/', $ua) ? 'sp' : 'pc';
}

add_filter('template_include', 'homeTemplateFilter');

function homeTemplateFilter($file)
{
  $template = basename($file);

  $templates = array(
    sprintf('%s_%s.php', basename($template, '.php'), getViewType()),
    $template
  );

  return locate_template($templates);
}
では、プラグインの有効化を行い、「index-pc.php」のみを用意した状態で確認します。
まず、PCで確認します。

通常の「index.php」ではなく、「index-pc.php」を読み込むことが出来ました。
では次に、スマートフォンで確認します。
「index_sp.php」を設置していませんので、意図した通り「index.php」が読み込まれています。
パーツテンプレート
さて、ベースとなるテンプレートの振り分けは出来るようになりました。
ですので次は、パーツテンプレートの振り分けを行います。
パーツテンプレートとは?
ここで説明するパーツテンプレートとは、以下のようなベーステンプレート以外の全てのテンプレートを指します。
header.php
footer.php
sidebar.php
{$name}.php
ソースを追う
いつものごとくソースを追います。
//wp-includes/general-template.php
function get_header( $name = null ) {
  do_action( 'get_header', $name );

  $templates = array();
  $name = (string) $name;
  if ( '' !== $name )
    $templates[] = "header-{$name}.php";

  $templates[] = 'header.php';

  if ('' == locate_template($templates, true))
    load_template( ABSPATH . WPINC . '/theme-compat/header.php');
}
一見すると、do_actionがあるのでフィルターで拡張が出来そうに見えますが、フィルターを経由する値は「$name」のみのようです。
「$name」を変更することで、強引に出来なくもないかもしれませんが、値を上書いてしまうために問題が発生します。
困りました。とりあえず、一旦保留で次に行きます。
気を取り直して、footer、sidebar、get_template_partを見てみます。
//wp-includes/general-template.php
function get_footer( $name = null ) {
  do_action( 'get_footer', $name );

  $templates = array();
  $name = (string) $name;
  if ( '' !== $name )
    $templates[] = "footer-{$name}.php";

  $templates[] = 'footer.php';

  if ('' == locate_template($templates, true))
    load_template( ABSPATH . WPINC . '/theme-compat/footer.php');
}

function get_sidebar( $name = null ) {
  do_action( 'get_sidebar', $name );

  $templates = array();
  $name = (string) $name;
  if ( '' !== $name )
    $templates[] = "sidebar-{$name}.php";

  $templates[] = 'sidebar.php';

  if ('' == locate_template($templates, true))
    load_template( ABSPATH . WPINC . '/theme-compat/sidebar.php');
}

function get_template_part( $slug, $name = null ) {
  do_action( "get_template_part_{$slug}", $slug, $name );

  $templates = array();
  $name = (string) $name;
  if ( '' !== $name )
    $templates[] = "{$slug}-{$name}.php";

  $templates[] = "{$slug}.php";

  locate_template($templates, true, false);
}
はい、get_headerと同じですね。。。。
対策
対策を考えます。
- override_function等を駆使し、デフォルトの関数を破棄後、新しくプラグイン側で定義し直す。
- get_header -> get_header_custom 等の別の関数を定義する。
まず、破棄ですがpecl等の拡張ライブラリを必要とします。
依存関係の問題で却下ですね。
ですので、少々不格好ですが別の関数を定義します。
function get_header_custom( $name = null ) {
  $templates = array();
  $name = (string) $name;
  if ( '' !== $name )
  {
    $templates[] = sprintf('header-%s_%s.php', $name, getViewType());
    $templates[] = "header-{$name}.php";
  }

  $templates[] = sprintf('header_%s.php', getViewType());
  $templates[] = 'header.php';

  if ('' == locate_template($templates, true))
    load_template( ABSPATH . WPINC . '/theme-compat/header.php');
}

function get_footer_custom( $name = null ) {
  $templates = array();
  $name = (string) $name;
  if ( '' !== $name )
  {
    $templates[] = sprintf('footer-%s_%s.php', $name, getViewType());
    $templates[] = "footer-{$name}.php";
  }

  $templates[] = sprintf('footer_%s.php', getViewType());
  $templates[] = 'footer.php';

  if ('' == locate_template($templates, true))
    load_template( ABSPATH . WPINC . '/theme-compat/footer.php');
}

function get_sidebar_custom( $name = null ) {
  $templates = array();
  $name = (string) $name;
  if ( '' !== $name )
  {
    $templates[] = sprintf('sidebar-%s_%s.php', $name, getViewType());
    $templates[] = "sidebar-{$name}.php";
  }

  $templates[] = sprintf('sidebar_%s.php', getViewType());
  $templates[] = 'sidebar.php';

  if ('' == locate_template($templates, true))
    load_template( ABSPATH . WPINC . '/theme-compat/sidebar.php');
}

function get_template_part_custom( $slug, $name = null ) {
  $templates = array();
  $name = (string) $name;
  if ( '' !== $name )
  {
    $templates[] = sprintf('%s-%s_%s.php', $slug, $name, getViewType());
    $templates[] = "{$slug}-{$name}.php";
  }

  $templates[] = sprintf('%s_%s.php', $slug, getViewType());
  $templates[] = "{$slug}.php";

  locate_template($templates, true, false);
}
確認
確認の準備をします。
ベーステンプレートを用意します。
//index_pc.php
<?php get_header_custom(); ?>

<p class="bg-success">pc用 index テンプレート</p>

<?php get_sidebar_custom(); ?>

<?php get_template_part_custom('test'); ?>

<?php get_footer_custom(); ?>
//index_sp.php
<?php get_header_custom(); ?>

<p class="bg-danger">sp用 index テンプレート</p>

<?php get_sidebar_custom(); ?>

<?php get_template_part_custom('test'); ?>

<?php get_footer_custom(); ?>
次にパーツテンプレートを用意します。
//header.php
<html>
<head>
<link rel="stylesheet" href="https://maxcdn.bootstrapcdn.com/bootstrap/3.3.5/css/bootstrap.min.css">
<link rel="stylesheet" href="https://maxcdn.bootstrapcdn.com/bootstrap/3.3.5/css/bootstrap-theme.min.css">
<script src="https://maxcdn.bootstrapcdn.com/bootstrap/3.3.5/js/bootstrap.min.js"></script>
</head>
<body>
<div class="container-fluid">
<p class="bg-info">標準ヘッダー</p>
//header_pc.php
<html>
<head>
<link rel="stylesheet" href="https://maxcdn.bootstrapcdn.com/bootstrap/3.3.5/css/bootstrap.min.css">
<link rel="stylesheet" href="https://maxcdn.bootstrapcdn.com/bootstrap/3.3.5/css/bootstrap-theme.min.css">
<script src="https://maxcdn.bootstrapcdn.com/bootstrap/3.3.5/js/bootstrap.min.js"></script>
</head>
<body>
<div class="container-fluid">
<p class="bg-success">pc用ヘッダー</p>
//footer.php
<p class="bg-info">標準 フッター</p>
</div>
</body>
</html>
//footer_sp.php
<p class="bg-danger">sp用フッター<p>
</div>
</body>
</html>
//sidebar.php
<p class="bg-info">標準サイドバー</p>
//sidebar_pc.php
<p class="bg-success">pc用サイドバー</p>
//test.php
<p class="bg-info">標準testテンプレート</p>
//test_sp.php
<p class="bg-danger">sp用test テンプレート</p>
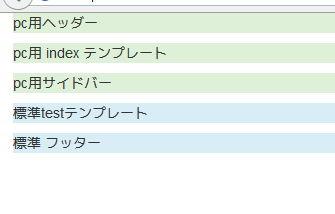
標準:青、PC:緑、SP:赤で表示されるように準備しました。
では、画面を表示してみます。
-
PC画面
-
SP画面

それぞれ、その端末用のテンプレートがあればそれを優先、無ければ標準のものを読み込むようになりました。
まとめ
今回は、テンプレートの出し分けについて説明しました。
プラグイン作成の説明の際に、毎回フィルターがと言っている気がします。
実際にWordPressは多くのタイミングで操作可能なように、フィルターフックが豊富に用意されています。
ですので、大抵の場合はそこにフィルターを設置することで拡張が可能なのですが、今回のように、拡張を行う箇所にフィルターがない、または箇所は良いが、通過する値が期待したものではない、といったことも残念ながらあります。
その場合は、別の箇所で拡張する、または今回のように新しく作ってしまうといった、工夫を求められることがあります。
プラグインを作成される際は、ご注意頂ければと思います。
今回作成したプラグイン:templatePlugin
コメントを残す